How to create a model in Dynamics 365 Finance and Operations?

September 30, 2024

Microsoft Dynamics 365 Finance and Operations provides access to the base source code, which is organized into various models. These models group related objects and code for easier management. While you can’t directly modify the base objects, you can add or modify functionality by creating new models. This is done through Visual Studio, using the Dynamics 365 menu.

In this blog, we will explain the concept of Dynamics 365 models and outline the steps to create your own custom model.

Introduction to Dynamics 365 model building

In Microsoft Dynamics 365 Finance and Operations, a model is a logical grouping of elements, including forms, classes, tables, and other objects created within a Finance and Operations project in Visual Studio. Understanding models in Dynamics 365 is crucial for developers who need to organize their work effectively. Additionally, models can encapsulate DLLs, references to other models, and metadata. These models are eventually packaged for deployment to different environments.

Easy steps to create a model in Dynamics 365

Dynamics 365 model creation process involves the following steps:

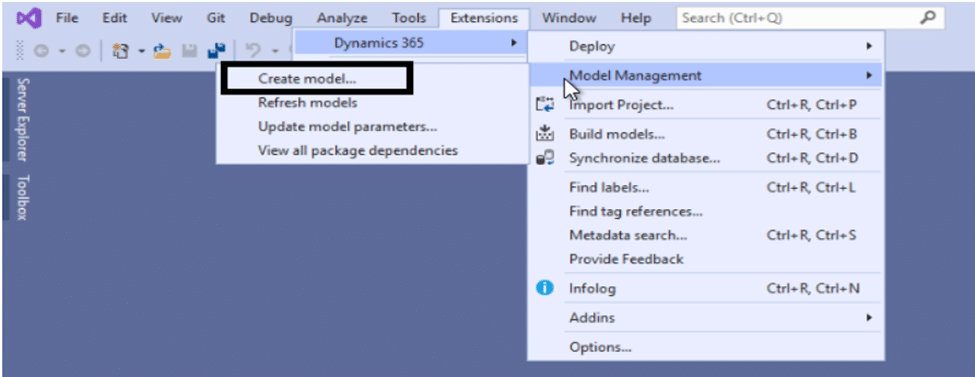
Step 1: Go to Visual Studio

  1. Open Visual Studio as an administrator.
  2. Go to the Dynamics 365 menu (if you don’t see it, navigate to Extensions > Dynamics 365).

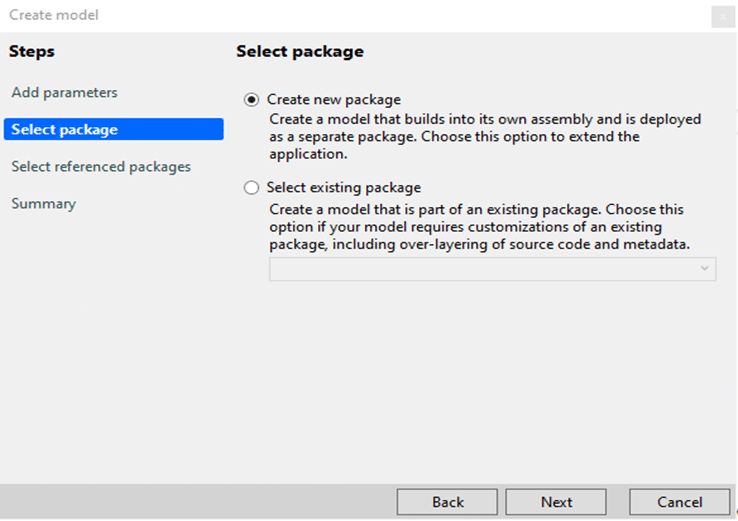
Step 2: Create the model

  1. Select Model Management and then click Create Model.
  2. After running Visual Studio as an administrator, the ‘Create Model‘ wizard will appear.

Step 3: Provide details for your new model

In the ‘Create Model‘ wizard, provide the following details for your new model:

  • Model name: Give your model a descriptive name.
  • Publisher name: Specify the publisher’s name (usually your organization’s name).
  • Version number: Set the version number for your model.
  • Layer: Choose the appropriate layer (e.g., Standard, VAR, ISV, etc.).
LayerDescription
USRThe user layer is for user modifications, such as reports.
CSRThe customer layer is for modifications that are specific to a company.
VARValue Added Resellers (VAR) can make modifications or new developments to the VAR layer as specified by the customers or as a strategy for creating an industry-specific solution.
SYSThe standard application is implemented at the lowest level, the SYS layer. The application objects in the standard application can never be deleted.
ISVWhen an Independent Software Vendor (ISV) creates their solution, their modifications are saved in the ISV layer.
GLSWhen the application is modified to match country or region-specific legal demands, these modifications are saved in the GLS layer.
SLNDistributors use the solution layer to implement vertical partner solutions.
FPKThe FPK layer is an application object patch layer reserved by Microsoft for future patching or other updates.

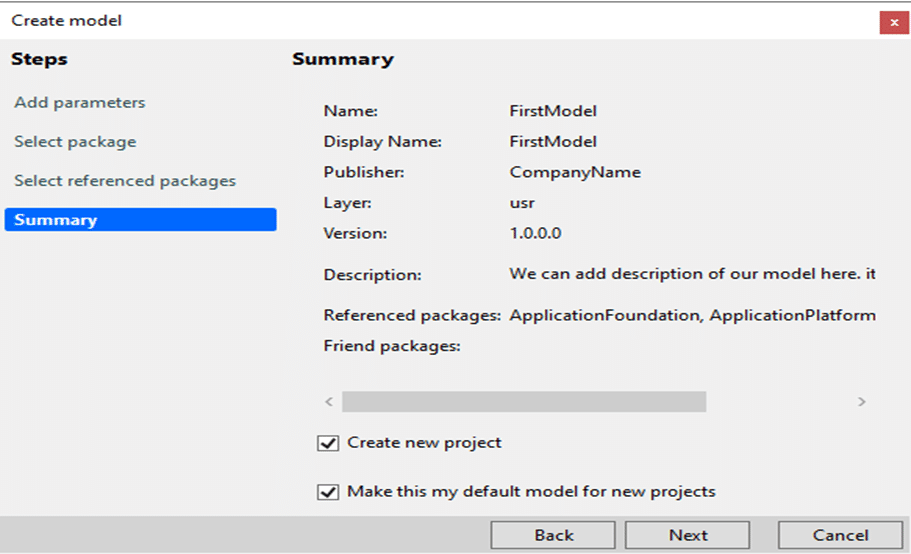
Step 4: Add Description(optional)

This step is optional, but if you want to, you can always add a brief description of your model. Here is an example:

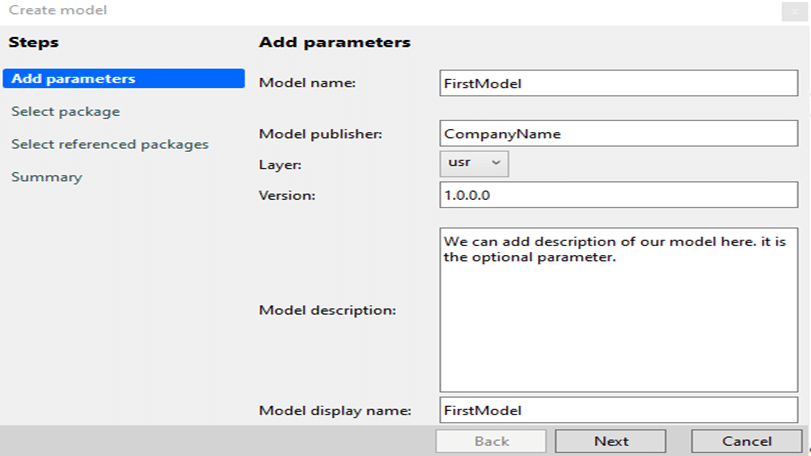
Once you are done, click the Next button.

Step 5: Select the package

On the next page of the wizard, go to select the package and follow these steps:

  1. Select ‘Create new package.’
  2. Avoid using the ‘Select existing package‘ option. It is only for supporting the legacy usage of models. This is a key step in the Dynamics 365 model building process.
  3. Once you are done, click on the Next button.

Step 6: Select the referenced packages

  • On the next page of the wizard, specify which other models/packages this model should reference.
    If your model’s objects or code references objects in other models, you must reference those models.
  • You can update referenced packages later if needed.
  • Start by selecting ‘Application Platform‘ and ‘Application Foundation.’ You may need to add more references later.
  • Click on the Next button.

Step 7: Getting familiar with the summary page

You will get all the details of the Model we have provided on the Summary Page.

  1. Optionally, check ‘Create new project’ to have the system create a new project right after the model is created. This is useful if you plan to start working on objects or code immediately.
  2. Optionally, check ‘Make this my default model for new projects’ to save time if you add objects and code to this model across multiple projects. This makes the new model the default for all new projects.
  3. You can change the default model for a project later by right-clicking on the project, selecting Properties, and changing the ‘Model’ property.
  4. Click the Next button.

By Clicking next, your Model will be created, and a new project window will appear.

Create a new Finance and Operations project in Visual Studio

A project is created to associate it with a new model. Any elements you add to the project, such as an extended data type (EDT) or a table with fields and a method, will also be included in the model. Here are the steps to create a project:

  1. A new project window is automatically opened in Visual Studio after creating the model.
  2. In the new project window, the type of project is set to Finance and Operations.
  3. The newly created model is automatically selected by default in the project settings.
  4. Right-click on the project within Visual Studio and select Properties.

In the properties window, you will see that the First Model is already selected as the default model. This is because we have previously configured the option to make this model the default.

Dynamics 365 Modeling best practices

When creating a model, observe the following best practices:

  • When deciding between single or multiple models, complying with Dynamics 365 modeling best practices is important.
  • Models are intended to group related objects. For instance, if you’re developing new functionality, such as a menu item, form, table, and class, all these related objects should be contained within the same model.

Flexibility with multiple models

  • While it’s possible to consolidate many features into a single model, developers might also create multiple models to segregate unrelated functionalities.
  • This flexibility allows for a more modular deployment, enabling smaller code footprints when certain functionalities are not required.
  • Dynamics 365 model building for beginners should start with simpler projects to understand the process before moving on to more complex scenarios.

Common challenges in Dynamics 365 model building

Although creating a model in Dynamics 365 is straightforward, there are potential challenges you may encounter:

  • While multiple models offer flexibility, they also introduce complexity.
  • Many companies find it simpler to maintain a single model to avoid circular dependencies, where models rely on each other.
  • Other common challenges in Dynamics 365 model building include managing dependencies and ensuring that models are not overly interconnected.

Conclusion

Creating a model in Dynamics 365 Finance and Operations allows you to customize and extend the platform to suit your business needs. Following the steps outlined in this guide, you can successfully set up your model and enhance your system’s functionality. However, if you encounter any challenges or need expert guidance, our team at Confiz is here to help. Contact us at marketing@confiz.com to learn how we can support your Dynamics 365 projects.