How to create a matrix on form in Dynamics 365 Finance & Operations X++

February 3, 2025

Creating a matrix on a form in Microsoft Dynamics 365 Finance & Operations (D365 F&O) allows users to visualize and interact with data in a structured and meaningful way. A matrix-style grid can help in scenarios such as budgeting, financial reporting, and inventory management by displaying data dynamically in a row and column format.

When working in D365 Finance and Operations the grid control is often the go-to solution for displaying data. It’s bound to a data source and provides a structured way to show rows and columns. However, what happens when you need to go beyond static grids and present data dynamically in a matrix format?

Creating a matrix on a form in Microsoft Dynamics 365 Finance & Operations (D365 F&O) allows users to visualize and interact with data in a structured and meaningful way. A matrix-style grid can help in scenarios such as budgeting, financial reporting, and inventory management by displaying data dynamically in a row and column format.

In this blog, we will explore how to create a matrix on a form in Dynamics 365 Finance and Operations and represent data in matrix format.

What are matrix forms in Dynamics 365 Finance and Operations?

In Dynamics 365 Finance & Operations (D365 F&O), a matrix on a form is a structured way of displaying data in a grid format, typically used to present information that involves multiple dimensions, such as products, locations, time periods, or attributes.

Where is it used?

  • Retail and commerce: To show product variants like size, color, or style in a matrix format.
  • Production and inventory: For capacity planning, demand forecasting, or stock availability.
  • Financial reporting: To compare financial data across periods, departments, or cost centers

Matrix representation is a standard feature in SSRS reports, but did you know it’s also possible to achieve this directly on a D365FO form? This is where Table Control comes into play.

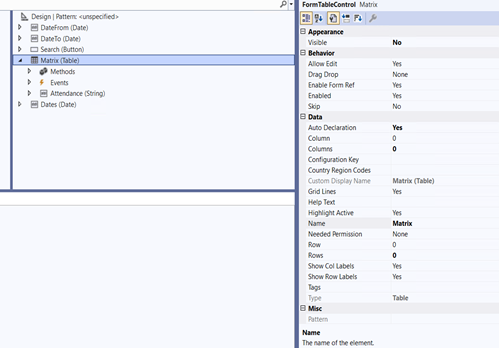
The Table Control is a powerful, unbound control that enables developers to create dynamic and interactive experiences. Unlike standard grid or ListView controls, it allows for:

  • Defining the number of rows and columns dynamically.
  • Varying the input type for each individual cell.
  • Enhanced user interaction with flexible, custom layouts.

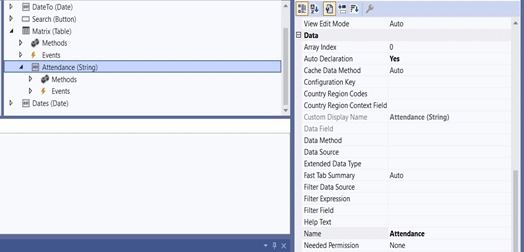
At its core, the Table Control relies on an edit control method, which dynamically determines the type of input control (such as text boxes, checkboxes, or dropdowns) for each cell. This capability makes it incredibly versatile for scenarios requiring dynamic and customizable data representation.

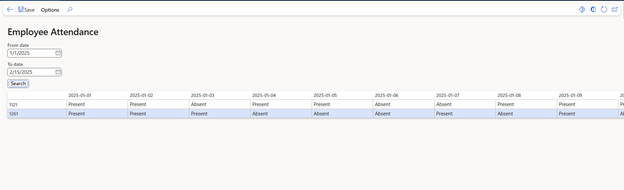
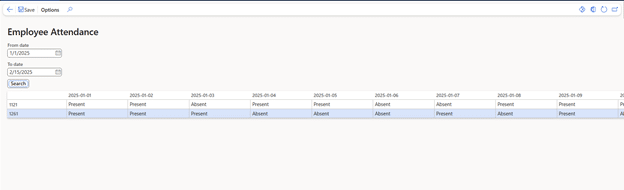
Our end result looks like this:

Prerequisites for creating a matrix on a form

To build a dynamic matrix in Dynamics 365 Finance and Operations ensure you have:

D365FO development skills

Knowledge of form design, controls, and X++ logic.

Development environment

A sandbox or VM with Visual Studio integrated with D365FO.

Understanding of table control

Familiarity with unbound controls and their customization.

Edit control method knowledge

Skills to create methods that define control types (e.g., text box, dropdown) dynamically for matrix cells.

Defined use case

A clear scenario, such as visualizing employee attendance.

Employee attendance data

You have employee attendance data stored, which needs to be transferred into the matrix.

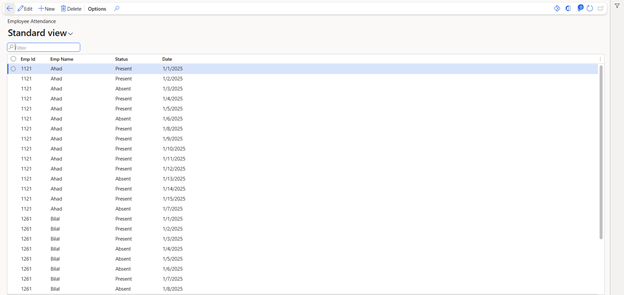
Use case: Dynamic employee attendance Matrix

Let’s explore how to create a dynamic matrix that showcases employee attendance. In this example:

  • Each row represents an employee.
  • Each column represents a specific date.
  • Each cell represents an employee attendance status.
  • The number of columns adjusts dynamically based on the selected date range.
  • The date range should be limited to 30 days. If the range exceeds 30 days, the matrix will not be generated.

Why table control anyway?

Unlike traditional grids, the Table Control allows you to:

  1. Dynamically adjust layouts: Rows and columns can be added or removed at runtime.
  2. Customize cell content: Each cell can have a unique input type, such as a dropdown, numeric field, or text box.
  3. Create interactive forms: By implementing custom logic, users can input data directly into the matrix while interacting with a highly dynamic and visually intuitive layout.

Steps to create a matrix in D365FO

  • Create New model >Create new solution >Create new Form
  • Setup your form: Add the Table Control to the form design.
    Define columns and rows: Use a date range to dynamically create the required number of columns and map rows to employees.
  • Create ToDate and FromDate controls and set the following properties: Auto Declaration – Yes
  • Create a button control on form named Search and override its clicked method.

Adding the table control

Right click on the Design node of the form where the matrix needs to be displayed and choose New control >> Table. Set an appropriate name for it and set the following properties: Auto Declaration – Yes, Width – Column width, Height – Column height.

Table control components

Insert a string field and set its Auto Declaration property to Yes. This field will be used to display the attendance status of an employee in each cell.

Declare your global variables in Class Declaration

[Form]
public class CFZTestMatrixForm extends FormRun
{
int row1,col1,totalCols,totalRows;
CFZEmployeeAttendance employeeAttendance;
CustTable custTable;
CustCurrencyCode currency;

Container               DateColHeader;
Container               IdRowHeader;

Create method InitializeMatrix() on the Form level

Initialize the number of the columns (dates) and rows (Employees) that will be displayed on the form.
/// /// Initialize the number of the columns (dates) and rows (Employees) ///
public void InitializeMatrix()
{
;
while select Id, AttDate from employeeAttendance
group by employeeAttendance.Id

{
    DateColHeader += employeeAttendance.AttDate;
    IdRowHeader += employeeAttendance.Id;
}

totalRows = conLen(IdRowHeader);
totalCols = 30;

}

Override run() method of Form

Here we set From Date and To Date on Form run.
/// ///Set From date and To date on form run ///
public void run()
{

dateFrom.dateValue(today());
dateTo.dateValue(today()+30);

super();

}

Create method runMatrix() on the Form level

Here, we populate the framework of the matrix with the dates and employees along with their attendance. Additionally, we fill in the attendance values in each cell.
/// /// Process to generate Employee Attendance Matrix ///
public void runMatrix()
{
;
element.InitializeMatrix();

Matrix.rows(totalRows);
Matrix.columns(totalCols);
Matrix.column(2);
Matrix.row(2);


for(row1 = 1; row1 <= totalrows; row1 ++)
{
    Dates.dateValue(Datefrom.dateValue());

    for(col1 = 1; col1<= totalcols ; col1++)
    {


        Matrix.setcolLabel(col1,Dates.valueStr());
        Matrix.setrowLabel(row1,conPeek(IdRowHeader,row1));

        while select employeeAttendance
            where employeeAttendance.Id == conPeek(IdRowHeader,row1)
            && employeeAttendance.AttDate == Dates.dateValue()
        {
            if(employeeAttendance.Status == CFZAttendanceStatus::Present)
            {
                Matrix.cell(col1,row1).data("Present");
            }
            else  if(employeeAttendance.Status == CFZAttendanceStatus::Absent)
            {
                Matrix.cell(col1,row1).data("Absent");
            }
        }
        Dates.dateValue(Datefrom.dateValue()+col1);
    }
}

}

Override clicked () method of Search button Control

On clicking the Search button, remove the records from the previously generated Matrix and generate a new matrix based on the selected From Date and To Date.
/// /// Remove previous generated Matrix and generate new matrix on Search click ///
public void clicked()
{
if(datefrom.valueStr() && dateTo.valueStr())
{
Matrix.deleteCols(1,totalCols);
Matrix.deleteRows(1,totalRows);
element.runMatrix();
}
super();
}

Override editControl() method of the Table Control

The last part is to override the editControl method and return value of Attendance Control Value. (Matrix is our control name for this example).
[Control(“Table”)]
class Matrix
{
/// ///Set Employee attendance status control value ///
/// _Column
/// _Row
///
public FormControl editControl(int _Column, int _Row)
{
FormControl ret;

    ret = super(_Column, _Row);
    ret = Attendance;// Name of Control

    return ret;
}

}

The final result

In conclusion, creating and representing data in a matrix form within D365 Finance & Operations (D365FO) using X++ is a powerful way to enhance data visualization and user interaction. By leveraging the capabilities of D365FO, you can build dynamic and intuitive forms that present complex data in a structured and accessible manner. This not only improves the efficiency of data management but also aids in better decision-making processes.

Also, The Table Control in D365FO unlocks a new dimension of flexibility for developers, enabling them to craft custom matrix layouts for dynamic data presentation. Whether it’s employee attendance, capacity, resource scheduling, or any other matrix-based data, this approach offers both power and elegance. As you continue to explore and implement these techniques, you’ll find that the flexibility and robustness of D365FO can significantly streamline your operations and provide valuable insights. In case you run into an error, reach out to us at marketing@confiz.com.